Replacing a Motherboard
by Stephanie Mortimer
Replacing a Motherboardby Stephanie Mortimer |
|
|
| Before:386DX40 | After:K6-2350mhz |
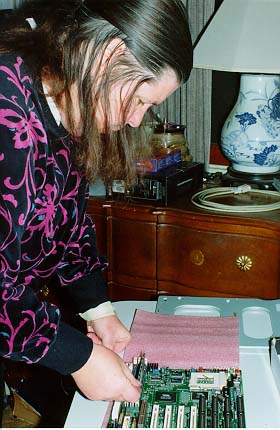
This is not intended as a tutorial, but rather as a review of a project that I did in my Computer Upgrade and Repair Class.
It shows how I replaced a 386 with an S15905 Trinity 100 AT Motherboard and an AMD K6-2 350mhz processor.
I'm hoping that by sharing what I've learned it will encourage other beginners to do their own motherboard replacements.
Click on the thumbnails to see a larger image.
29 Easy Steps
Step 1: Make Back
Ups and Print Out Information
Step 2: Buy the New Motherboard
Step 3: Read the Manual!![]()
Step 4: Get Ready
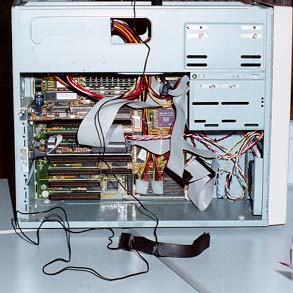
Step 5: Turn off the PC and Remove the
Case.
Step 6: Record the Physical
Configuration: Jumper and switch settings, cable orientation and placement, etc.
Step 7: Clean inside the case
with compressed air. Don't blow on it.![]()
Step 8: Unplug
the peripherals, including the power cable.
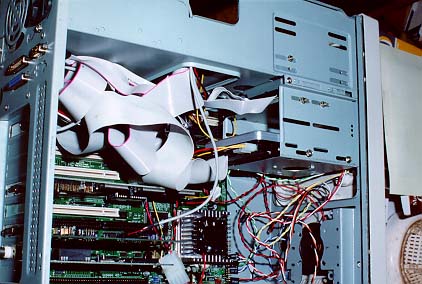
Step 9: Remove the Cards
Step 10: Unplug the Wires to the Motherboard.
Step 11: Remove the Cables![]()
Step 12: Remove
Anything Else That is In the Way
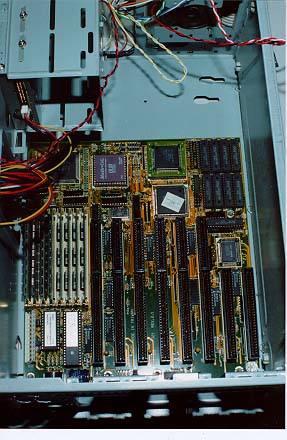
Step 13: Removing the Old Motherboard:
Step 14: Remove the Memory Chips and CPU
Step 15: Unpack the New Motherboard
Step 16: Configure the Jumpers and
Switches.![]()
Step 17: Install
the New Memory.
Step 18: Install the CPU
Step 19: Install the New Motherboard
Step 20: Replace the Wires.
Step 21: Replace the Cables![]()
Step 22: Put
the Bus Expansion Cards (Cards)Back Into Slots:
Step 23: Attach Internal Cables and Wires
to the Cards.
Step 24: Plug in Keyboard.
Connect the Mouse.
Step 25: Connect External Cables.
Step 26: Plug in the PC![]()
Step 27: Install
Any Necessary Software.
Step 28: It Works!
Congratulations!
Step 29: Replace Cover.
Reasons to Replace a Motherboard
|
Why You Might Not Want to Replace a Motherboard
|
Other
Considerations When Choosing a New Motherboard
|
|
| Step 1:
|
Make backups and print out
information:
|
|
| Step 2: | Buy the New Motherboard: Be sure to keep all receipts and manuals, and request any additional documentation that may be available. (Don't buy it in the first place without adequate instructions.) |
 New Motherboard |
| Step 3: | Read the Manual! | |
| Step 4: |
Do's and Don'ts:
|
|
| Step 5: | Turn off the PC and
Remove the Case: All the screws on the outside of the case are not there to hold
the cover on. The screws that hold on the cover are usually towards the outside edges of
the case. Put the screws you take out in a safe place. It is a good idea to put each type
of screw or fastener in a different location, and you may want to count them Removing the case-> |
 |
| Step 6: | Record the Physical Configuration: Jumper and switch settings, cable orientation and placement, etc.Look inside the case and see where everything is and what it is attached to. Some things will probably be in different locations on your new motherboard, but it doesn't hurt to know which things attach where. You can mark cables and cords with small pieces of masking tape if you want to. | |
| Step 7: | Clean inside the case with compressed air. Don't blow on it. Use a commercial product. Although there is a small chance that an electrostatic charge could build up near the nozzle of a compressed air cannister, there is more danger of damage caused by the moisture in your breath. | |
| Step 8: | Unplug the peripherals, including the power cable. Remember: Don't touch anything inside the computer unless you are wearing a grounding strap or have touched the bare metal of the case first to release electrostatic charges. Electrostatic discharge is deadly! | |
| Step 9: | Remove the Cards: Remember where they were connected. Unscrew the card and slide it out of the case gently .Remember to handle them by their metal brackets and by their edges as much as possible, and be careful not to bend them. (Bending cards or motherboards can cause microscopic cracks in connections that will cause intermittent problems later on.) Count and keep track of screws. (A loose screw inside the case can damage everything). Lay the cards on an anti-static mat. | |
| Step 10: | Unplug the Wires to the Motherboard.
Make a list of what you unplug and make sure you know where it was. Masking tape can be
used to mark wires and cables. The wires to the motherboard being unplugged--> |
 |
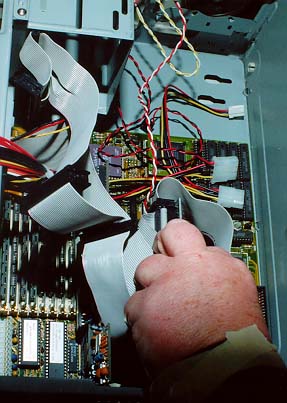
| Step 11: | Remove the Cables
Removing the cables--> |
 |
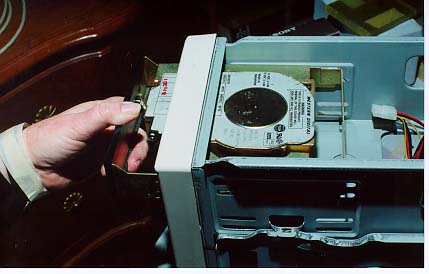
| Step 12: | Remove Anything Else That
is In the Way: In this case I had to remove the hard drive so that I could move
things around inside the case. You might also have to remove the power supply,
floppy drives, CD-ROMs, or move ports. Removing the hard drive--> |
 |
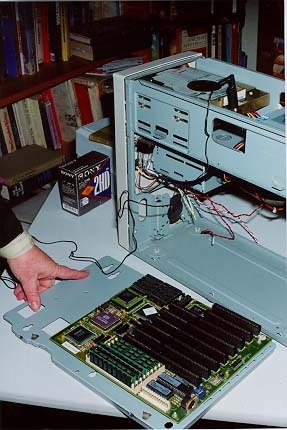
| Step 13: | Removing the Old
Motherboard: Locate and remove motherboard retaining screws, saving them &
any plastic washers. Here is where you use the needlenose pliers, to pinch the tops of the
nylon standoffs so you can slide them out. (If you have extra standoffs, or are planning
to replace the old motherboard in a new case, you can leave them in.) Slide the motherboard to disengage the standoffs from their mounting slots. (This is a tricky part) Lift the motherboard up and out of the case and place it on a static-free surface, such as an antistatic mat. (If things don't go right, you may need it again.) |
|
| Step 14: | Remove the Memory Chips
and CPU. You may be able to re-use or re-sell them, so remove them gently and
place them in a safe container. Again, if you are planning on replacing all the memory and
the CPU, you might want to leave the old CPU and memory with the old motherboard
Removing the memory chips and CPU--> |
 |
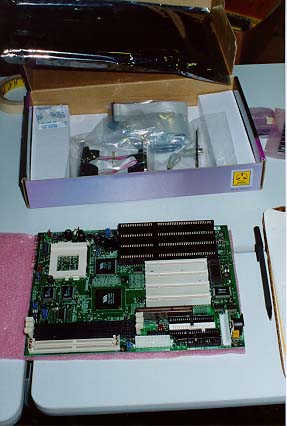
| Step 15: | Unpack the New
Motherboard:- You should have already done this, but double-check to make sure
that you have everything that should be included (mainboard, cables, manual, driver CD,
etc....) Make sure you are properly grounded before touching it.- Try very hard not to bend it. Handle it on the edges. Do not touch the bottom.Inspect it visually for obvious damage, and set it on a flat antistatic surface Note: Some people wait until the new motherboard is inside the case before doing anything. Our reason for doing it this way was so that we could see what we were doing, and have room to work.. The order of work was chosen so that we worked on the least expensive and/or more durable things first. |
 The New Motherboard |
| Step 16: | Configure the Jumpers and Switches. Jumpers are used to set CPU bus speeds, CPU clockmultipliers, and CPU Core Voltage Settings, CPU type, SIMM Voltage Settings, DIMM clock speed, PowerSupply Type, Split Voltage Settings, and other things.If you are lucky, your motherboard settings will already be set to what you need. Some motherboards are advertised as “Jumperless” but they may still have a few jumpers. | 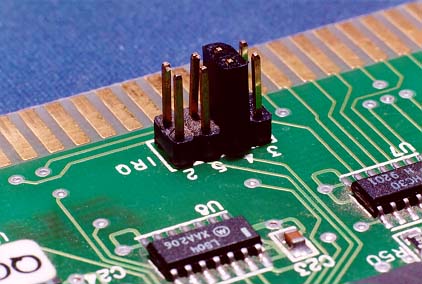 Jumpers - Enlarged |
| Step 17: | Install the New Memory.See
instructions that came with the board for proper configurations. DIMMS or SIMMS will
either slide in or clip into the sockets. You usually start with the lowest numbered slots
or banks first.
Putting in the new memory--> |
 |
| Step 18: | Step 18: Install the CPU.
This is the empty socket for the CPU. You can see the ZIF (Zero Insertion Force) lever on the top--> - Do not touch the CPU pins with your fingers.- Do not force the CPU into the socket.This Socket has a ZIF (Zero Insertion Force) arm. Most CPUs are designed so that there is only one right way to place them. (Note: remember that we are installing an AMD K6-2 CPU on a Socket 7 board. A hershey-bar pentium on a Socket 1 board will look quite different.) |
 |
Two views of the CPU:  |
||
| Install the HeatSink and Fan.Install the cooling device (heat sink and/or fan)- This is a CPU-Cool Z1 Socket 7 Processor Cooler, and we used thermal transfer grease to fill the gaps between the heat sink and the processor to give maximum heat transfer. | 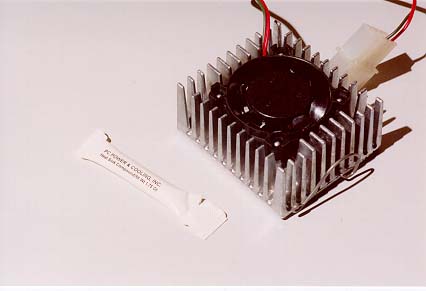 Heatsink & Fan |
|
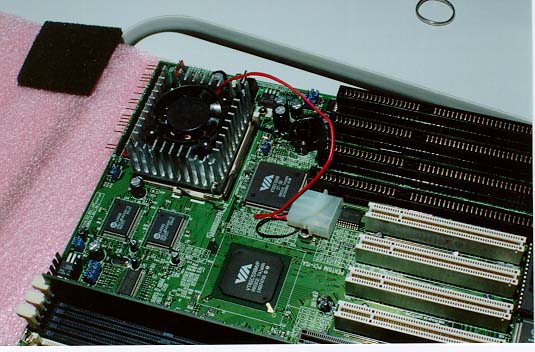
| Plug in cooling fan power
connector into motherboard or power connector from power supply. CPU installed--> |
 |
|
| Step 19: | Install the New
Motherboard- Put nylon standoffs in motherboard holes that align to slots on
case.-Use at least one metal standoff where a motherboard hole aligns with a threaded hole
in the case. - (Different motherboards have different patterns of holes, and different cases have different arrangements of threaded holes and slots, but there is usually one metal standoff to serve as a ground)- Set the board inside the case so that the standoffs are engaged. Holes should be aligned.- Push the standoffs up from the bottom. You may need pliers to pinch the tops together.- Make sure that the metal fastening screw does not short any of the traces on the motherboard. Do not overtighten. Note: If there is a hole in the motherboard where you'd like to support the motherboard with a standoff, but there isn't a corresponding hole or slot on the case, you can insert a nylon standoff with the button that engages the slot cut off. |
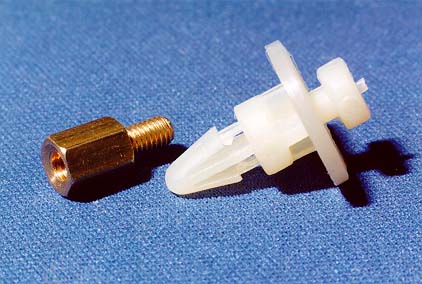 Standoffs |
| Step 20: | Step 20: Replace the Wires.- Plug in the power connection from power supply to motherboard.- Make sure the black wires of the AT style are in the center of the two connectors.The ATX should have a one-piece connection. Replacing the Wires--> |
 |
| Step 21: | Replace the Cables- Remember
red usually indicates Pin 1- The order to plug in cables is usually:– Hard
drive(s), Floppy drive(s), then Com and printer port cables. Replacing the Cables--> |
 |
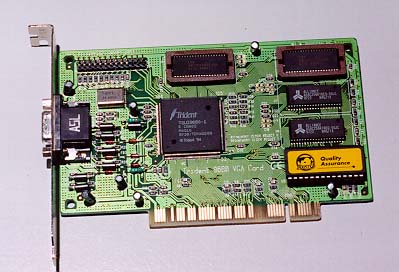
| Step 22: | Put the Bus Expansion Cards (Cards)Back Into Slots:- Never force them, try not to bend them. Make sure you have the right kind of slot for the card (ISA, PCI, etc..). You may want to rearrange them to allow better air circulation or prevent interference to soundcards. Don't forget to screw them in. This is a PCI SVGA Video Card--> |
 |
| Step 23: | Attach internal cables and wires to the cards.
|
|
| Step 24: | Plug in Keyboard. Connect the Mouse. | |
| Step 25: | Connect External Cables. (Don't put the cover back on yet!). |
|
| Step 26: | Plug in the PC If it doesn't
work:– Make sure all cards and memory are in firmly – Check CMOS – Make sure cards are compatible – Investigate software incompatibility |
|
| Step 27: | Install Any Necessary Software. | |
| Step 28: | It Works! Congratulations! |
|
| Step 29: | Replace Cover. | |
| Acknowledgements: - All photos & technical assistance by Harry R. Meyer |
Links:
Build
your own PC![]()
A Guide to PC Motherboards
Tyan's Home Page
Anand's
MotherboardReviews![]()
Next PC Network - Build Your Own Computer
The Upgrade Center
Brad's Web Page![]()
Depository Index
Motherboard Home World
 Disclaimer:
I'm a Macintosh fan. Why am I playing with PCs? One reason is that PCs are the dominant
machine, for the present, and I want to know about them. Another reason is that there are
few Mac classes available. Disclaimer:
I'm a Macintosh fan. Why am I playing with PCs? One reason is that PCs are the dominant
machine, for the present, and I want to know about them. Another reason is that there are
few Mac classes available.As far as computer repair and upgrade goes, although I've used different Macs for nearly five years, I haven't had many reasons to learn about repair. My last Mac only had a 100mg hard drive, and crashed when it was full, but a friend was able to help me boot it back to life, and after I lightened its load it didn't crash again. I've never had to replace a defective part. I've just kept one Mac for several years and then passed it on when I could afford a newer one, rather than upgrading bit by bit like some PC users seem to do with their machines. I believe both of my old Macs are still in use -- one as a game machine, and the other as a child's computer. I have heard that in general Mac users tend to keep their computers longer before getting a new one. Part of the reason may be that Mac hardware is better integrated. Once you've got one you shouldn't have to upgrade it right away. Also, Macs aren't very modular. While some of the PC's in our house have been frankensteined out of surplus parts (Igor's monitor came out of a dumpster), it isn't that easy to find Mac components in the trash, and if you could find them, they probably wouldn't fit. So -- PC or Mac? Try both, and make up your own mind. Either one will run Linux. These pages, by the way, were made using both Zaphod (my Mac) and Igor (my PC) with different versions of Front Page.(I do not recommend Front Page.) I have another web site made entirely on my Mac using shareware and do-it-yourself HTML. You probably couldn't tell the difference unless you look at the source code. Want to see something beautiful? Check out the new G4's and iBooks!! |